Rooms
Introduction
Group discussions take place in rooms.
NOTE. Before you add a new room, you can create a space for it. For instructions, refer to Manage spaces.
Manage rooms
Create a room
The below instructions are about adding a new room to a space. If you want to start a one-to-one chat, refer to Manage direct messages, instead.
-
Navigate to the sidebar on the left and right-click the space where you want to add a new room, then select Room.
Alternatively, go to the Rooms section, click the + button, and select New room.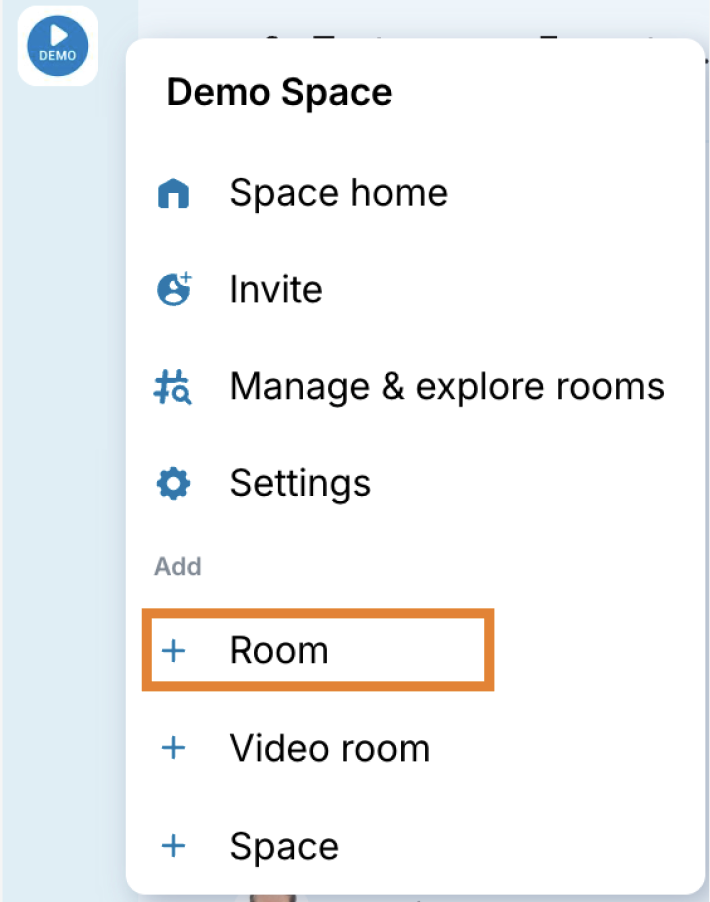
-
Enter the name and topic of your room. The topic is optional.
-
Open the drop-down menu to select the visibility setting of your room:
- Visible to space members. Everyone in the space will be able to find and join your room.
- Private room. Only people invited will be able to find and join your room.
- Public room. Anyone will be able to find and join your room.
NOTE. You can change these settings later.
-
A. Click the toggle to enable or disable end-to-end encryption. This option may be disabled or enabled by default in some organizations.
NOTE. You cannot disable this later.
NOTE. When end-to-end encryption is enabled, users will only see messages sent after they join the room, as they don’t have the encryption keys for earlier messages.
B. If your room is a public room, enter a room address for you room.
-
For advanced settings, select Show advanced.
Under the advanced settings, you can block anyone who is not part of the same server from ever joining your room. You can enable this setting if the room is only used for collaborating with internal teams on your homeserver. Click the toggle to enable or disable this setting.
NOTE. This setting cannot be changed later.
-
Finish by selecting Create room.
Add an existing room to a space
Instead of creating a new room, you can also add an already existing room to your space.
-
Navigate to the side bar on the left and click the space where you want to add an existing room.
-
Click the + icon at the top and select Add existing room. Alternatively, go to the Rooms section, click the + button, and select Add existing room.
-
Select the room(s) that you want to add from the list. You can also use the search bar to search for rooms.
-
Finish by selecting Add.
Share a room
-
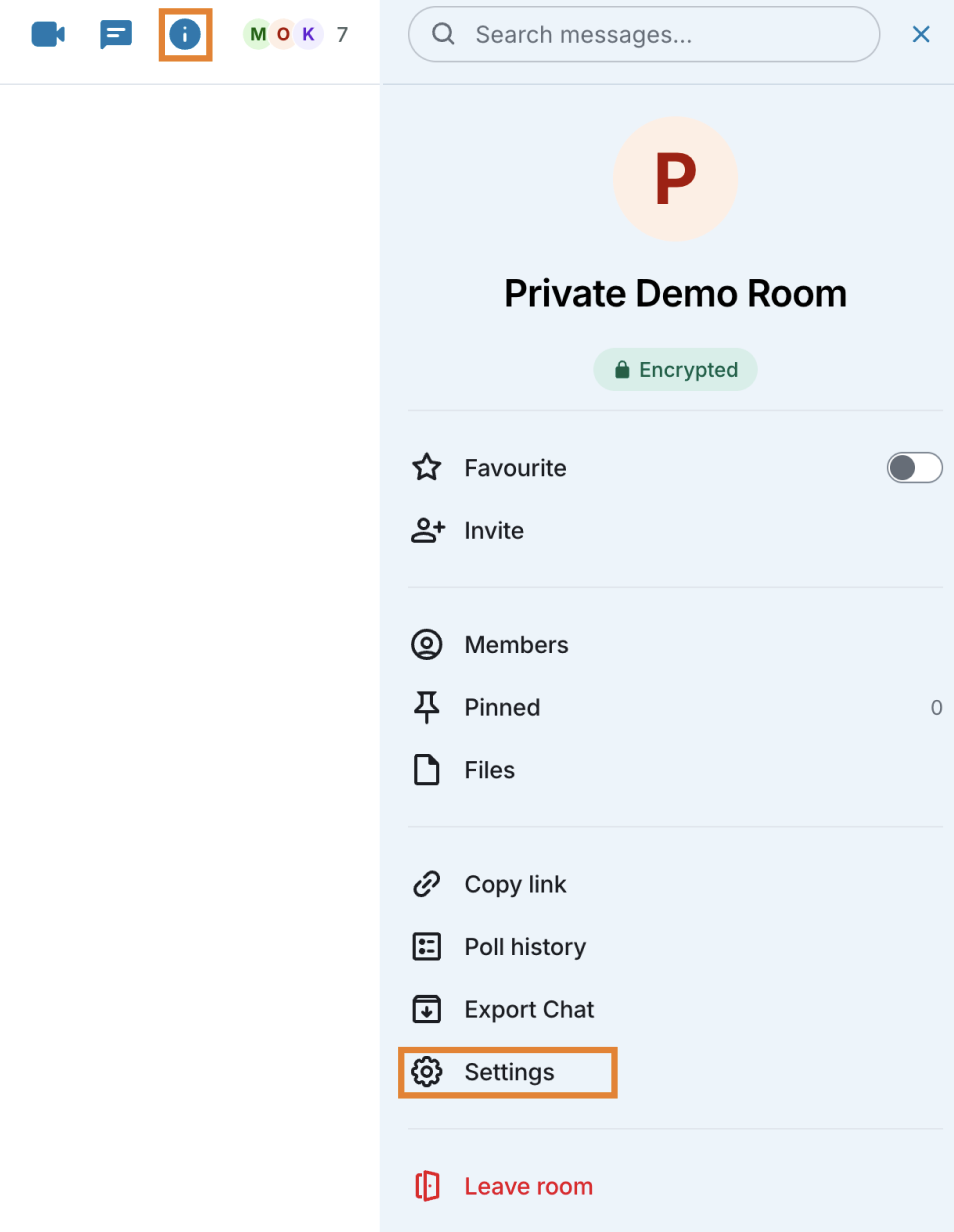
Click the info icon at the top right corner of the chat.
-
Select Copy link.
-
There are several ways to share the room:
- Copy the link. Select the Link to most recent message checkbox if you want to share a link to the most recent message in the room.
- Share the link on social media. Share the link on social media.
- Share a QR code. Right-click the QR code to copy or save the image.
NOTE. If the room is private, the user needs an invitation from the room admin to join the room.
Remove a room from a space
-
Navigate to the sidebar on the left and right-click the space, then select Manage and explore rooms.
-
In the middle panel, select the room that you want to remove and click Remove.
Join a public room
-
Select Home from the side bar.
-
Click the + icon at the top and select Join public room.
You can scroll the list of suggested public rooms or use the search bar to search for them.
You can even search for public rooms in other servers if your home server is federated. To open the server list, click the drop-down menu at the right side of the window.
Leave a room
-
Go go to room and click info icon at the top right corner of the chat and select Leave.
NOTE. If you are the only person in the room, no one will be able to join it in the future, including you.
-
Confirm by reselecting Leave.
Add a room to favorites
-
Navigate to the side bar and click the space where the room is located.
-
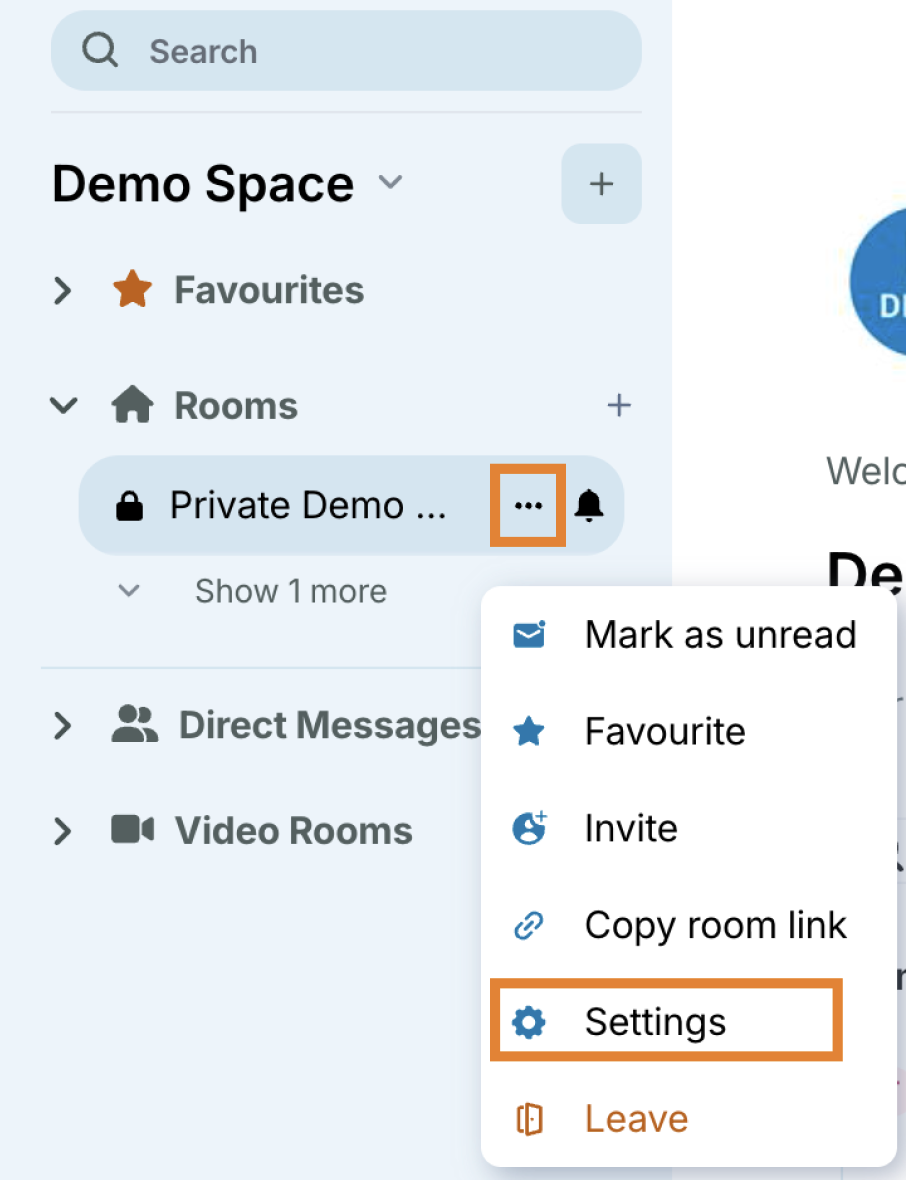
Click the three dots on the room and select Favorite.
The room appears under the Favorites tab.
To remove a room from favorites, select Favorited. The room disappears from the Favorites tab and reappears under the Rooms tab.
Room features
SalaX Secure Messaging provides multiple features to help you communicate effectively within a room.
Message formatting
You can format your messages using the formatting toolbar in the message input field.
Supported formatting options include bold, italic, strikethrough, code blocks, quotes, and links.
Attachments
You can attach files to a message by clicking the attachment icon in the message input field.
Supported attachments include documents, images, and other file types. Attachment size limit depends on the server settings.
Voice messages
You can send a voice message by clicking the microphone icon in the message input field.
Voice messages are recorded and sent directly to the room.
Polls
You can create polls to collect votes from room members.
You can create and view polls from the message input area. There are two types of polls:
- Open poll. Voters see the results as soon as they have voted.
- Closed poll. Results are only revealed when you end the poll.
Polls are also available in the room details panel under Poll history.
Emojis and reactions
You can add emojis to your messages using the emoji picker in the message input field.
You can also react to messages with emojis by selecting the reaction option on a message.
Threads
Threads allow you to reply to a specific message in a dedicated conversation thread.
To start a thread, hover over a message and select Reply in thread.
Thread replies are grouped separately from the main room timeline.
You can also open the Threads view by clicking the Threads icon in the room header.
This view shows all threads related to the room and allows you to filter them:
- Unread threads. Displays threads with unread messages.
- My threads. Displays threads you have participated in.
- All threads. Displays all threads in the current room.
Threads activity Center
The Threads activity center provides an overview of thread activity across your rooms.
To open the Threads activity center, click the Threads icon in the left-side panel.
This opens a dedicated view showing rooms with unread thread notifications.
If there is no active thread activity, a message is displayed indicating that there are currently no rooms with thread notifications.
Replies
You can reply directly to a specific message without starting a thread.
To reply to a specific message, hover over a message and select Reply.
Replies reference the original message in the room timeline, making it easier to follow the conversation context.
Pinned messages
Pinned messages highlight important messages in the room.
Pinned messages are visible at the top of the room and can also be accessed from the room details panel under Pinned.
Files
The Files section displays all files shared in the room.
You can open or download shared files from the room details panel under Files.
Export chat
You can export the room’s message history from the room details panel using Export chat.
Voice and video calls
You can start a voice or video call by clicking the call icon in the room header.
Room members can join active calls based on room permissions and server configuration.
Manage room settings
There are two ways to access the room settings:
-
From the left panel:
-
From the info tab:
General
The General settings page allows you to manage basic room information, addresses, and additional room options.
Room information
In the General section, you can update the basic details of the room:
- Room name. The display name of the room.
- Room topic. A short description of the room’s purpose.
After making changes, click Save to apply them or Cancel to discard your changes.
Room addresses
Room addresses make it easier for users to find and join the room.
Published addresses
Published addresses can be used by anyone on any server to join the room.
To publish an address, it must first be set as a local address.
- Main address. Select the primary published address for the room.
- Publish this room to the public room directory. Enables or disables the room’s visibility in the homeserver’s room directory.
If no published addresses exist, you can add one using the Room address field and clicking Add.
Local addresses
Local addresses allow users on the local homeserver to find the room.
If the room has no local addresses, enter a new address in the Room address field and click Add to create one.
URL previews
When enabled, URL previews display additional information for links shared in the room, such as titles, descriptions, and images.
In encrypted rooms, URL previews are disabled by default to prevent the homeserver from collecting information about shared links. You can enable or disable this option using the toggle.
Leave room
Click Leave room to leave the room. Once you leave, you will no longer receive messages from the room unless you are re-invited.
Security & Privacy settings
The Security & Privacy settings page allows you to manage encryption, access rules, and message history visibility for the room.
Encryption
This section controls end-to-end encryption for the room.
- Encrypted. Indicates whether the room is encrypted. Once encryption is enabled, it cannot be disabled.
- Never send encrypted messages to unverified devices. When enabled, encrypted messages are not sent to unverified devices from this device.
Access
The Access section defines who can find and join the room.
- Private (invite only). Only users who are explicitly invited can join the room.
- Space members. Users who are members of selected spaces can find and join the room. Multiple spaces can be selected.
- Public. Anyone can find and join the room.
History visibility
The Who can read history? section defines which users can view the room’s message history.
For encrypted rooms, message history is only visible to users after they have joined the room.
Roles & Permissions settings
The Roles & Permissions page allows you to manage privileged users in the room and define which roles are required to perform specific actions.
Privileged users
The Privileged Users section displays users who have elevated roles in the room.
To change a user’s role, select the desired role from the dropdown next to the user and click Apply.
Add privileged users
Use this section to grant additional privileges to one or more users in the room.
- Search for a user using the Search users in this room field.
- Select the Power level to assign.
- Click Apply to grant the selected role.
Permissions
The Permissions section defines which roles are required to perform specific actions in the room.
You can configure the minimum role required for actions such as:
- Default role. The role assigned to users when they join the room.
- Send messages. Controls who can send messages.
- Invite users. Controls who can invite new users.
- Change settings. Controls who can modify room settings.
- Remove users. Controls who can remove users from the room.
- Ban users. Controls who can ban users from the room.
- Remove messages sent by others. Controls who can delete messages sent by other users.
- Notify everyone. Controls who can send room-wide notifications.
- Change room name. Controls who can rename the room.
- Change permissions. Controls who can modify room roles and permission levels.
- Change history visibility. Controls who can change who is allowed to read the room history.
- Change main address for the room. Controls who can update the primary room address.
- Change room avatar. Controls who can change the room avatar.
- Upgrade the room. Controls who can upgrade the room to a new version.
- Change server ACLs. Controls who can manage server access control lists for the room.
- Change topic. Controls who can update the room topic.
- Manage pinned events. Controls who can pin or unpin messages.
- Send reactions. Controls who can send reactions to messages.
- Remove messages sent by me. Controls who can delete their own messages.
- Modify widgets. Controls who can add or modify room widgets.
Poll history
The Poll history page displays polls that have been created in the room.
You can switch between the following views:
- Active polls. Displays polls that are currently open and accepting votes.
- Past polls. Displays polls that have been closed.
Notifications
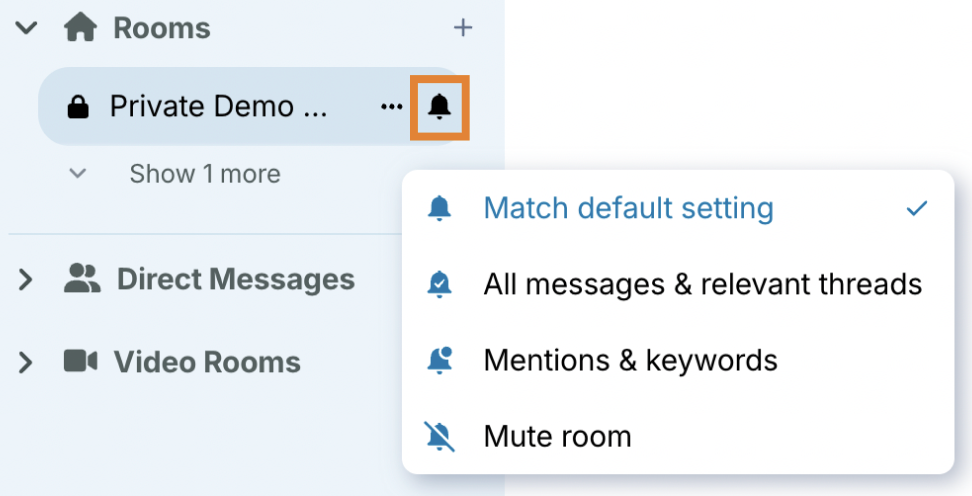
The Notifications page allows you to control how and when you receive notifications for the room.
Notification level
You can choose one of the following notification options:
- Default. Receive notifications based on your global notification settings.
- All messages & relevant threads. Receive notifications for all messages and relevant threads in the room.
- @mentions & keywords. Receive notifications only when you are mentioned or when configured keywords are used.
- Off. Disable all notifications for the room.
To edit the room’s notification settings, you can alternatively click the Notification icon next to the room in the left-side panel.
Sounds
This section allows you to customize notification sounds for the room.
- Notification sound. Displays the currently selected sound.
- Reset. Resets the notification sound to the default.
- Set a new custom sound. Upload and save a custom notification sound for the room.
Manage room members
Invite a user
-
Navigate to the sidebar and select the space where the room is located. Click the three dots on the room and select Invite. Alternatively, open the room, click Info, go to Members, and click Add.
-
Enter a name, email address, or username into the text field. Users that are already using Secure Messaging appear on the Suggestions list below.
NOTE. Some suggestions may be hidden for privacy.
-
A. If the user is on the list, click it and select Invite.
B. If you can't find the user on the list, you can share the room with them. Click share this room and follow the instructions.
Once the user receives the invitation, they have three options to choose from:
- Accept. The user accepts the invitation and joins the room.
- Reject and ignore user. The user rejects the invitation and ignores the user. The user can no longer invite the user to a room.
- Reject. The user rejects the invitation.
Revoke invitation
-
Click the info icon at the top right corner of the chat.
-
Select Members.
-
Under Invited, click the user whose invitation you want to revoke.
-
Under Admin tools, select Revoke invite.
Remove a user
- Click the room.
- Click the info icon at the top right corner of the room.
- Select Members.
- Click the user who you want to remove.
- Under Admin tools, select Remove from room.
Ignore a user
Ignoring a user hides all messages and invites from them.
-
Click the room.
-
Click the info icon at the top right corner of the room.
-
Select Members.
-
Click the user who you want to ignore.
-
Under Options, select Ignore.
-
Confirm by reselecting Ignore.
To unignore a user, select Unignore.
Mute a user
Muting a user prevents them from posting to the room. However, they can still see the room.
- Click the room.
- Click the info icon at the top right corner of the room.
- Select Members.
- Click the user who you want to mute.
- Under Admin tools, select Mute. To unmute a user, select Unmute.
Ban a user
Banning a user bans them from the room. They can no longer see the room or join the conversation.
- Click the room.
- Click the info icon at the top right corner of the room.
- Select Members.
- Click the user who you want to ban from the room.
- Under Admin tools, select Ban from room. To unban a user, select Unban from room.
Remove a user's recent messages
Removing a user's recent messages removes messages sent by that user permanently for everyone in the conversation. For a large amount of messages, this might take some time. Do not refresh the client in the meantine.
- Click the room.
- Click the info icon at the top right corner of the room.
- Select Members.
- Click the user whose messages you want to remove.
- Under Admin tools, select Remove recent messages.
- Check the Preserve system messages option if you don't want to remove system messages, such as membership changes and profile changes, on this user.
- Finish by selecting Remove Messages.
Verify a user
Verifying a user is optional. It helps ensure that you are communicating with the correct person and that the connection between you is secure.
Start user verification
To verify a user:
- Select the user user you want to verify.
- Select Verify.
- Select Start verification.
A verification request is sent to the other user.
Accept the verification request
To continue the verification, the other user must:
- Select Verify device when they receive the verification request.
- Select Verify by emoji.
A set of emojis is displayed on both of your screens.
Confirm the verification
Compare the emojis shown on both devices.
NOTE. We recommend comparing the emojis in person or over a video call to make sure you are verifying the correct person.
- If the emojis match and are in the same order, select They match.
- If the emojis do not match or are in a different order, select They don’t match.
Once both users confirm that the emojis match, the verification is completed successfully.